Translate

Showing posts with label tonic. Show all posts

Sunday, 2 January 2022

International Heart and Soul Challenge 124

 It's a new year! I hope you all had a lovely Festive Season and that 2022 is very kind to all of us.

The challenge for this fortnight is to make something that isn't a card. Apart from that, the choice is yours. In fact, I feel a bit of a cheat compared to my team-mates who have made some amazing things, but right now, (mid-December) I don't have time to do anything I don't urgently need, so I went for some Christmas tags.


I started with 2 sheets of A4 Hobbycraft smooth card. Using Distress Oxide ink in Speckled Egg, Broken China and Hickory Smoke, I 'smooshed' the damp card to create a pale background. When the sheets were dry, I went to work. I used Distress Ink in Blueprint Sketch, Broken China, Evergreen Bough, Pine Needles, and Festive Berries which I applied lightly with blending brushes.


Then, with a stencil from Stamperia, I applied some Crafter's Companion metallic ink in Silver and Pewter. Then, I stamped both sheets randomly with snowflakes (from the most recent edition of Creative Stamping Magazine, and a Lavinia text stamp using mainly Versafine Clair ink, although for a few I used some Blueprint Sketch),.


Then, I cut sections of both sheets using part of a Tonic die set. I then finished each piece by edging with a suitable ink, before sticking the result to more white card cut using the same die set.


To complete, I added some silver cord, and they're ready to write and apply to gifts.


I do hope you can join us this time!

Sunday, 29 August 2021

International Art and Soul Challenge 116

 This fortnight's challenge is hosted by my team mate Chriss, who's chosen the theme Birthday.


I started with a Nellie Snellen stamp. I liked it when I saw it on a website, and loved it when I stamped it. I coloured it with Promakkers and cut it using a Tonic die and matted it on gold mirror card cut with a Spellbinders die. The sentiment was stamped using a pre-inked stamp I've had for many years and cut with a Sizzix die. The background was created with a gell press background of distress ink. To that, I added some feathers from a Pretty Quick stamp set and added some further texture using a text stamp from Printable Heaven. For that, I used a mixture of Distress ink and Versafine Clair.

I hope you can join us this time.


Monday, 23 November 2020

A Handbag Gift Box

This project should have been for a Crafty Cardmakers challenge. That blog has ceased to exist, but I had posts scheduled and decided to continue to post my projects on the scheduled dates.

I decided to get out a trusty Tonic die set, and made this:

The structure of the bag uses standard heavy weight card in a dark brown. For the upper layer, I created some faux leather using a Sheena Douglass technique. I didn't have enough Kraft card for the project, so I just used some fairly heavy paler brown card as you can see. I must say, it looks the part, although it got a lot softer and generally seemed less robust than when I've used Kraft card in the past. I completed the box with gold mirror card accents.


Monday, 17 August 2020

Crafty Cardmakers Challenge 261

The challenge for this fortnight is to use lots of layers.

I love stitching on card, and dies that prick the holes for you make it easier. I loved this set of dies from Tonic when I saw them, and decided to give them a whirl for this challenge. I cut the various layers and stuck them roughly using a minimum of glue towards the centre. Then I pricked through each layer's holes to the layers below and stitched the whole thing together. Believe me, by the time I was stitching the top layer, I really knew there was a lot of card to get through. I even had to change to a bigger needle after I broke to finer ones in a couple of minutes. I rather like that this design gives several options of how to stitch, although I could wish the holes on the knotwork die closer together to allow better filling of the pattern. Because the dies in this set are Verso, I can see there are options for cutting in to a section rather than cutting it separately which should mean there are more ways to use the dies.

I do hope you can join us this time.

Sunday, 5 July 2020

International Art and Soul Challenge 87

The theme for this fortnight is Tiny Things. How you interpret that is up to you!

I used quite a few 'tiny things' in my card, and even came up with a sentiment that seems to me to work too.

I started with some Mixed Media paper and gave it a background tint using Distress Oxide ink, then added some flowers and butterflies using some Card-io Majestix stamps (the first 'tiny' thing.) I added a little Perfect Pearl powder to add a little shimmer, but that's not obvious in the photo. Next, I cut a 'trellis' using a Tonic die, and added some branches and lots of tiny flowers. The branches are a combination of Spellbinders and Cheery Lynn as were the flowers. I then added some flower centres and 'leaf buds' using liquid pearls.

Finally, I designed the sentiment in Photoshop Elements and printed it on photo paper. In case it's hard to read, it says, 'The Greatest Successes in Life are the Culmination of Lots of Tiny Things'.

I do hope you can join us this time.

Sunday, 26 April 2020

International Art and Soul Challenge 82

For this challenge, you can make anything you like in any colours providing the end result isn't a square or rectangle.

I made, surprise, surprise, a card.

I used my Tonic Celtic Circles dies for all die cutting here except the flowers, including adapting a square card to a round one. There is, of course, a slightly flattened hinge to the card itself, but that is rather perfectly hidden by the lilac layer which was cut using the same die.

The central panel was stamped using stamps from Creative Stamper magazine. The flower border uses flowers cut using a Cheery Lynn die. Both the die cut and stamped flowers were finished with a spot of Liquid Enamel in white.

I do hope you can join us this time.

Sunday, 8 December 2019

International Art and Soul Challenge 73

Our last challenge of the year is to make anything other than a card. So, a perfect chance to showcase a hand-made gift, tag or piece of home decoration. (Or something else ... so long as its not a card.)

My son's partner loves to travel, so I decided to make her a travel journal.

 I made a box to keep all the bits in too. The front is decorated with Acrylic paper and acrylic paint applied and textured using a rubber tool. The compass was cut using a Tonic die, and both it and the edges of the paper were brightened up with some gilding wax.
And the journal in the box.The journal was cut using a Sizzix/Eileen Hull Wrapped Journal die. I put a layer of Kraftex over some grey board before cutting, then decorated using acrylic paint, my gelly plate, and various stamps and stencils. I added a little gilding was to complete the effect, and made a closure with gold elastic. When the messy bit was done, I covered the inside in some white paper.

I used papers I printed from a Crafter's Companion CDRom to create the pages, although I did make them less saturated, as I wanted a more subtle effect. I printed direct to Ryman Matte double-sided card.


You'll note that I didn't add any details to the pages. That's because I wanted her to be able to add things where she wanted, rather than where I'd stuck something. So, I provided some bits to do that.

 A box containing some tiny envelopes. The post mark stamps are from Marianne, and the envelope die is from Printable Heaven.

A box filled with pouches cut using a Tonic die set, and offcuts of the Crafter's Companion papers.

And finally, some pockets cut using a Sizzix/Tim Holtz die.

 This is my first time using Kraftex. I would have preferred to use some leather or even faux leather or the journal, but I've struggled to get supplies. I know I could buy faux leather by the metre, but then I would have loads of a single colour and I'd like variety. And each piece needs to be about 6 by 13 inches, so most offcuts wouldn't be big enough. I hope the Kraftex gives the journal a robust enough cover, but won't know that for a while!

I do hope you can join us.

Monday, 1 July 2019

Crafty Cardmakers Challenge 237

The challenge at Crafty Cardmakers for this fortnight is to use a die or punch. Once you've done that, there are no restrictions on what you produce!

For this card, I started with a background which I created using my gelli-plate, some Distress Oxide ink and a stencil. The die cuts were cut using a die from Tonic's Sew Pretty range. I stitched them with metallic gold thread. The sentiment was stamped with a stamp from John Lockwood/Creative Expressions, and I highlighted the pretty flowers with a little glitter using Crafter's Companion glitter pens in yellow and teal. I completed the card with some sticky gems.

I do hope you can join us this time.

Monday, 17 June 2019

Crafty Cardmakers Challenge 236

For this fortnight's challenge we want to see anything but a card. Apart from that, it's 'anything goes'!

Years ago, I saw a tutorial on decorating a candle using an image stamped onto tissue paper. I always fancied having a go, but never did. (To be honest, I don't use many candles as my husband can't abide them!) Anyway, a craft group of which I'm a member was looking for some ideas for things they hadn't tried before, and I suggested candle decoration. But, never having tried it before, I found a tutorial and had a go in advance.

The video I found is this one from Lavinia Stamps.

And this was the result:

Not a Lavinia stamp, but one of the gorgeous set of Macintoshesque stamps from Clarity. I stamped the image onto tissue paper using Memento ink and coloured with Promarkers. Beware if trying this: like all alcohol markers, Promarkers have a tendency to leak through paper, but this is much more significant with tissue paper. Fortunately, I had some copy paper under my tissue paper. Once I'd trimmed around the image, I wrapped some wax paper around it and used my heat gun to gently melt the tissue paper into the candle. I was fairly impressed with the result!

But, a pretty candle needs a box, doesn't it? I checked, and the square Tonic Kaleidoscope box is just about the right size for this candle. (Its just s smidge small, but I managed to get it to work.)

 So, I stamped the same panel onto Crafter's Companion Neenah card and again, coloured with Promarkers. I assembled a box to fit - but I only have the two shortest sets of sides, so I had to fudge the side panels. I cut the longer of the two I had, leaving the end cut line over the edge of the cutting plate, and then continued the cuts with a trimmer, and extended the crease lines.

And here's the completed set.

I'm going to do the another one using the Snowdrops stamp from the same range so I've got a 'matching' set, but I'll wait and do that at the craft group.

I do hope you can join us this time.

Sunday, 31 March 2019

International Art and Soul Challenge 55

The challenge for this fortnight is Clean and Simple with Blue. Of course, clean and simple is relative. I'm in awe off people who can make really simple cards which just ooze elegance. I really struggle with white space, and my simplest designs just look amateurish to me. So, I compromised.


My original plan was just what you see above, but the white background was supposed to be plain white. I laid it all out and wasn't at all happy.

This morning, the postman delivered a parcel from Crafter's companion that I wasn't expecting for a couple of weeks. (I find it often takes a couple of weeks for them to dispatch, although that might be because I often order during sales!) Anyway, I ordered some A4 stencils to go with the larger gelli-plate I got for Christmas as well as some new colours of gilding wax. I used the handwriting stencil (back to front, as it happens) with some Weathered Wood Distress Ink on the right hand side, and then the fern and crackle stencil. I continued with Distress Ink around the fern itself, then added some beautiful Diamond Imagination Crafts gilding wax. Then, I added a little distress ink around the die cut image (stamp is from Studio Light)  and I was much happier.

I do hope you can join us this time.

Monday, 29 October 2018

Crafty Cardmakers Challenge 221

The theme at Crafty Cardmakers for this fortnight is Explosion of Colour. So, we want to see bright, colourful projects, but other than that, you can make whatever you want.

A short while ago, I made a card using very subdued colours which I really liked. That's unusual for me, because I generally prefer bright colours, so I thought I'd try something similar but make the colours bold and vibrant. But the result of that was awful! I really didn't like the effect at all, so I binned it. And went back to the drawing board.

And then, while looking out a stencil, I came across a template I've had for quite a while. It's a Fiskars paper pricking template, and I haven't used it much since I got my Sew Pretty dies. But it has one big advantage over the dies - if you want several concentric circles, it's much easier than having to line up the dies. And, as a child, I loved the idea that you can get curves out of straight lines so much, I spent ages drawing out axes on paper and pencilling in lines. My dad spotted me doing this, and made me a board with nails so I could do the same thing in a permanent way, and that adorned my bedroom wall for a long time. Anyway, I decided to make an explosion of colour rainbow-style, and this is what I came up with.

I pricked 6 concentric circles , and threaded between the holes to get the pattern you can see. I used machine embroidery thread that more or less cover the rainbow. I framed the result with black card, and cut the aperture and decorative circle using Tonic dies.

The result could be a card, but it's not going to be! It's going up on the wall of my craft room!

I do hope you can join us this time.

Sunday, 1 April 2018

International Art and Soul Challenge 30

This fine April Fool's Day, we're challenging you to try something new. So, we want to see a card type you've never made before. Any design, any theme, just try something new!

I don't know what this style is called, but its definitely new to me.

It comes in two parts. This is the outside. I've used some Crafter's Companion dies here to make the triangular panels. They don't cut on the third (hidden) side, so I left a border there for attaching to the backing sheet. The flower is also Crafter's Companion. I started with a gold-coloured card and brushed on some Ripe Persimmon Distress Ink, and finished with some Liquid Pearl.


For the inside, I wanted something colourful that could be glimpsed through the lacy outer pocket. I started by die cutting a square using a Tonic die set. Then, I added some Distress Ink in Ripe Persimmon, Peacock Feathers, Scattered Straw, Faded Jeans and Broken China. Then, using the a heart die from the same Tonic set, I cut some sticky note paper and used it to mask the central area. Then, I got out my Tapestry stamps. I've always loved the idea of these, but this is the first time I've actually been happy enough with the result to use it! I stamped with the same inks as I had used in the background and edged with more Ripe Pesimmon. To finish, I stamped a sentiment using a stamp from a recent Creative Expressions release. I used my Tonic Stamp Platform for this and the very first stamp pad I ever bought! It's a basic dye pad, and I used it because I've always got problems stamping with Distress Inks using clear stamps. They just don't ink clear stamps nicely.

And that's it. I'm looking forward to being inspired by lots of lovely new ideas!

Sunday, 18 March 2018

International Art and Soul Challenge 29

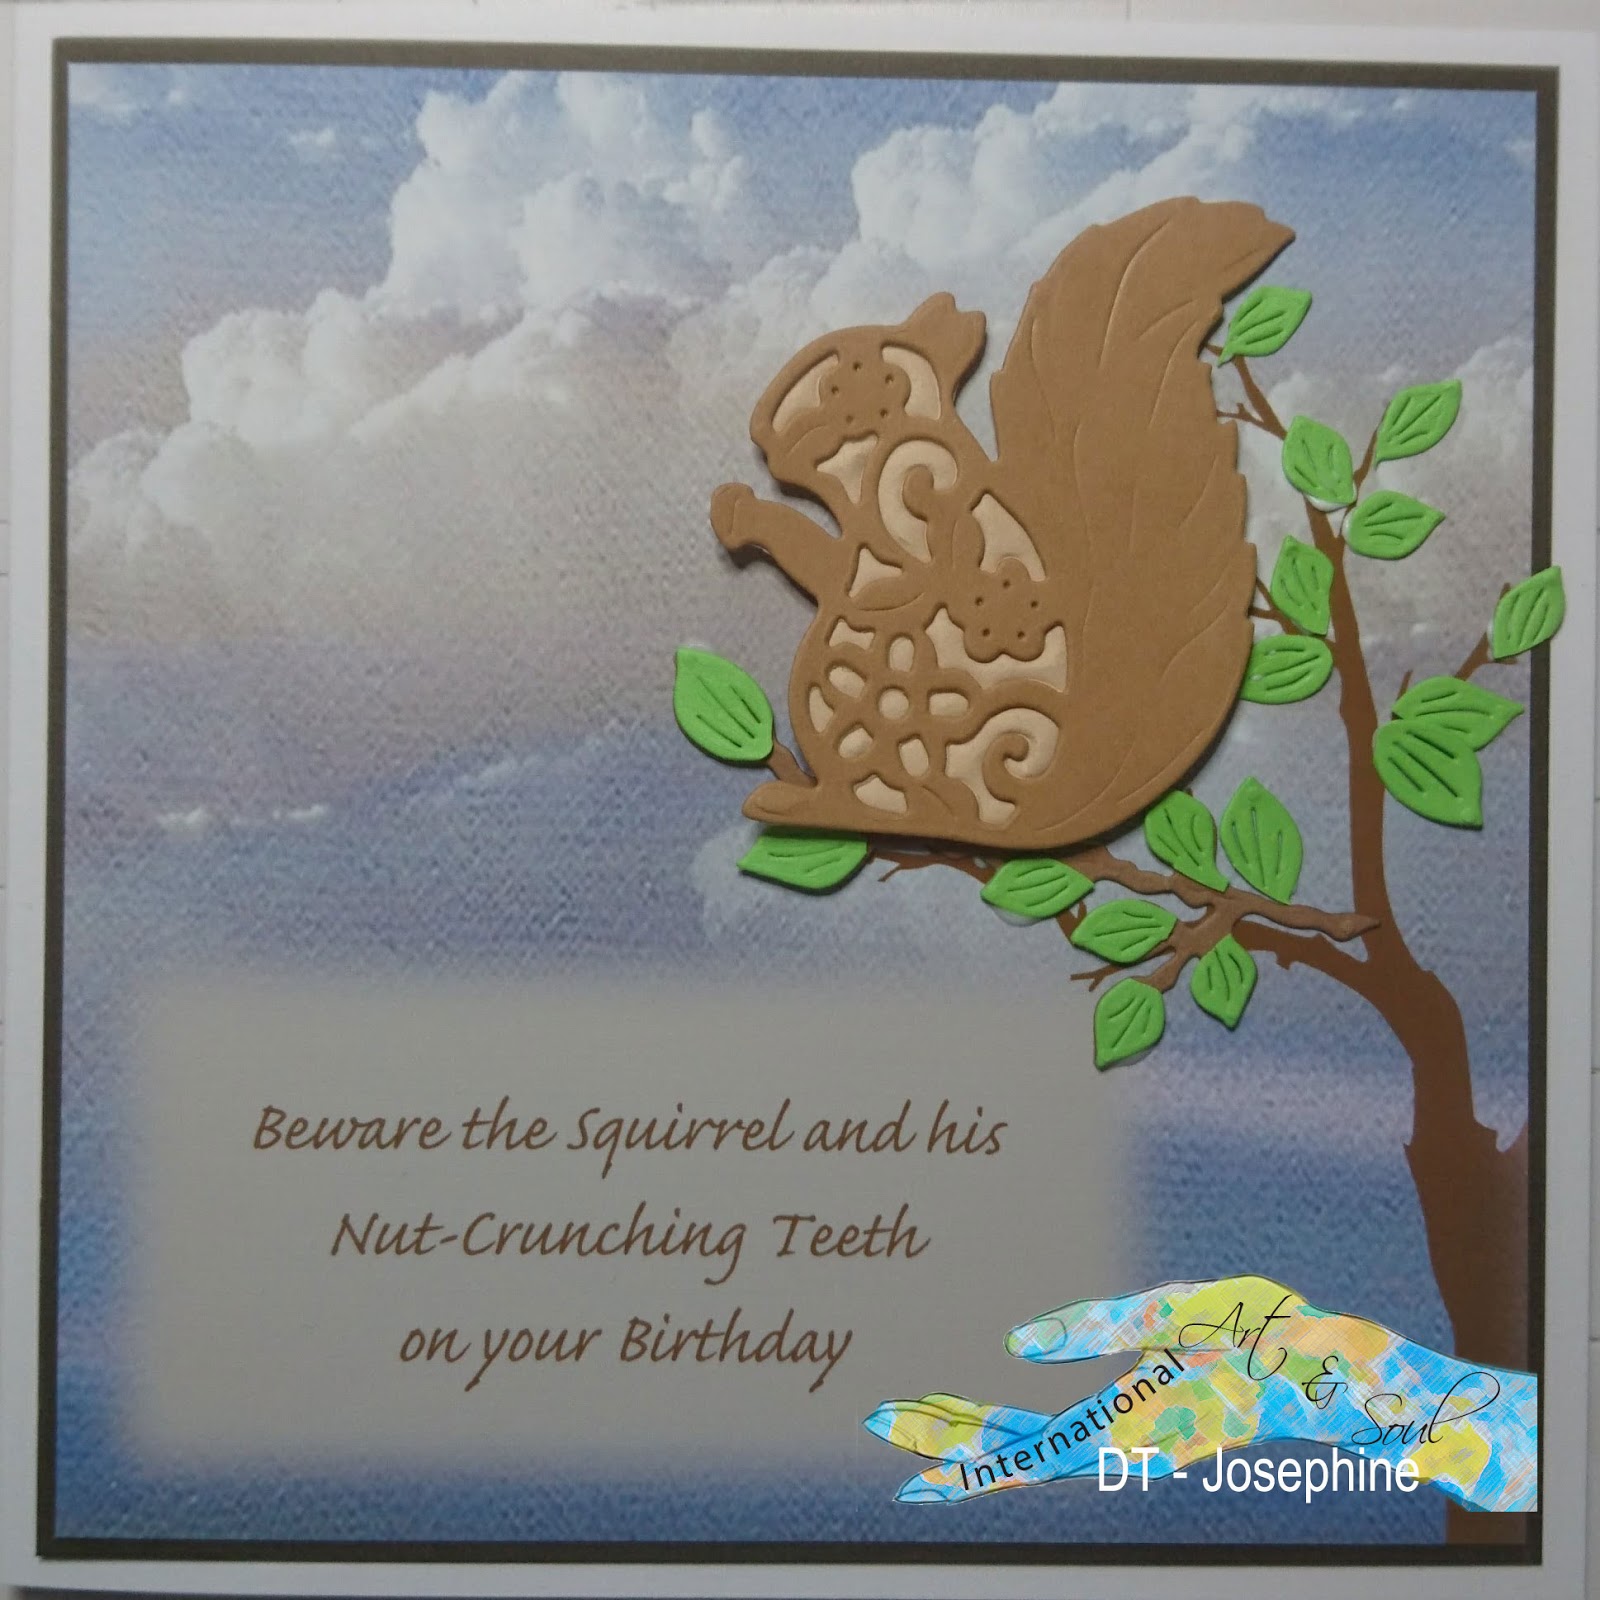
The challenge for this fortnight it so use humour. I'm normally wary of using humour in cards as I'm very aware that one person's humour can be another's embarrassment, so this was a hard challenge for me. Then, as I sat in my usual chair, I saw this:

That little squirrel lives on the standard lamp in our living room. It was given to me by someone I'd worked with throughout the 17 years I was at the special school I left at the summer. And there's a story behind it.

About 15 or so years ago, I was walking to school. It was summer and I was wearing some open sandals and as I went down a footpath I used regularly, I spotted a squirrel further down. I expected it to climb up the fence and be gone into the nearest tree, but instead, this squirrel ran at me. I stopped dead, rather surprised and a little anxious. Fortunately, it got to within a foot of my poor, unprotected feet and decided to run away again. When I got to work, I told a couple of colleagues who both found the incident hilarious. And ever--after, the story of the squirrel and its 'nut-crunching teeth' became a bit of a standard. (I don't think it was my phrase, but it was attributed to me whenever the story was re-told.) Anyway, the woman who gave me the squirrel when I left has a birthday coming up, and I'd already bought a die set in her honour.

And this was the result. The background paper is from a set by Panda Bear that I got while I was on the Stitchy Bear design team. I've added a tree silhouette and the wording using Photoshop Elements. I think the die is from Tonic, and the set included a couple of branches and leaves which I've added, along with some extra leaves on their own. For the inside, I've used the same background, but expanded it to fit across the inside of the card.

And that's it! The humour is very specific to just a few people, but at least I know it was at my expense rather than someone eles's!

Sunday, 18 February 2018

International Art and Soul Challenge 27

Our challenge for this fortnight is to Use Something you Already Own. That's definitely good advice - especially if, like me, you're running out of storage space!

I've really loved seeing all the snow globe dies that appeared last winter. I've been on the verge of buying one more than once, but saw (probably on Facebook) that someone had used a Tonic handbag die to get the same effect. I didn't make a note of it when I saw it, so I can't attribute.

And there it is! I've used circle dies for the globe and moon, and a panel from one of the Tonic Handbag dies for the base. For the pattern over it, I used another die I already had - this one cuts a rectangular snowflake pattern. The background was embossed mirror card, and I've used various dies from my collection to make the hills, trees and houses.

I've edged bits with ink and glitter, and added glitter to the globe before sealing it with glue-gel.

I hope you can join us! Let's see what you've used.

Monday, 13 November 2017

Crafty Cardmakers Challenge 200

Our challenge for this fortnight at Crafty Cardmakers is to make anything but a card.

I decided to make a gift look a little more special.


A friend at work really wanted one of these jugs for her kitchen, so with her birthday coming up, it seemed and ideal gift. But it looked quite plain - it really needed the flowers she plans to put in it. For various reasons, real flowers are impractical before she gets the jug home, so I improvised with some tissue paper and hand-made flowers. The whole paper assembly will just lift out, so the jug is undamaged.

Each of the flowers were made using Sizzix Susan's Garden dies. I shaded petals and leaves with Pan Pastels. And that's it! It'll go in a gift bag and I hope she's going to like it.

I hope you can join us this fortnight.

Sunday, 15 October 2017

International Art and Soul Challenge 19

The challenge at International Art and Soul for this fortnight is Anything but a Square or Rectangle!

I've continued on my attempt to get some more Christmas cards done, and this is what I came up with.


I've used dies from a variety of manufacturers for this card. Firstly, the card itself was cut using a Tattered Lace die set. The various embellishments supplied don't really work for Christmas, so I looked elsewhere in my collection. The lower mirror board was embossed using a Cuttlebug folder, and the Season's Greetings is from a Tonic die set.


The poinsettia was cut using a Marianne die I've had vor a very long time. I added some detail using Pan Pastels.

And the robin is, I think, a Dovecraft die. I chose not to pop out the inner cuts as I liked the texture they provide.

And that's it! I hope you can join us this time!


Sunday, 17 September 2017

International Art and Soul Challenge 17

The challenge at International Art and Soul this fortnight is to make something for a special occasion. The occasion can be whatever you want, so long as it's special!

I was asked by a friend to make a card for a ruby wedding anniversary, and this is what I came up with.

I've used a die set from Tonic and put the centre together using Photoshop Elements. The cherubs come from the very first CDRom I bought for cardmaking - the Crafty Image Emporium that I got from Crafty Computer Paper. It's the same image both times, but I flipped on to keep the arrangement looking symmetrical.

I hope you can join us this time.

Sunday, 6 August 2017

International Art and Soul Challenge 14

This fortnight's challenge at International Art and Soul is to make a box or bag. It can be for any purpose and design, colour etc is entirely up to you.

After almost 17 years working in a special school, I took the decision to leave at the end of the summer term.  During that time, I've worked with many wonderful children, but those same children often presented with very challenging behaviour, and consequently, good teamwork among the adults was essential. I decided to make a little gift for all those women I've worked closely with at the school with whom I still had contact, and the starting point was a gift box. For some of them, I used a die set from Tonic - the Kensington handbag die. I do like these, and I especially like how there are variations on a theme which stop them from looking too samey.

This is one variation of the bag. The paper is from Joanna Sheen's Pamela West CDRom. The chain was from a pack I bought via Amazon which just seemed to work better than ribbon or twine for the purpose.


A more standard version of the bag, with paper from the same CDRom.

And another ...

And another.

And again - this time with gorgeous paper from the Mehndi Peacock paper pack by our own DT Co-ordinator, Jane, here at International Art and Soul!

And the same combination with a different colour base.

And for a bit of variety, I've also made some using the Chelsea die set, again from Tonic. While I prefer how this design looks, it's an absolute pain to get it to close in a non-permanent way. I've used hook and loop fastener, but there's enough tension in the closure that means that the sticky side peels away from the card or from the plastic of the fastener. I ended up having to add some hot glue to keep the fastener attached to the card. There is a tab arrangement in the lacy over layer, but I've struggled to get that to work, and it's not there if you choose to use patterned paper. I notice that, in the Tonic demonstration video, the demonstrator uses hot glue to close the bag on a one-off basis. Anyway, enough moaning from me.

This time I used one of the gorgeous marble effect papers from the Crafty Image Emporium CD Rom from Crafty Computer Paper.

And the same paper with a contrasting card base.


And finally, another Chelsea design, this time with paper from the Pamela West CDRom.

I've cross stitched a coaster or handbag mirror for each of the recipients, each with their name and the symbol of the class we worked in together. 

So, that's that. I hope you'll have time to join us this fortnight.

Monday, 3 July 2017

Crafty Cardmakers Challenge 192

This time, at Crafty Cardmakers, we're playing Tic-Tac-Toe. Although were I come from, that's known as xs and os. The grid allows lots of possibilities, and you can follow any horizontal, vertical or diagnonal line.


I've followed the left-hand vertical line, so my card includes gems, stitching and has a summer theme.


I started with a Tonic Sew Pretty die. Now, I really like this range, but I can't help but think that whoever designed them hadn't done much embroidery on paper (or maybe they're just really, really clever.) That's because, to me, the obvious way to start and finish your thread on the back of paper embroidery is to use sticky tape, and these gorgeous dies just don't have enoough solid area to do that. So, after cutting out the shape, I stuck the die cut to a contrasting piece of card, and then used a paper-piercer to follow the holes through both thicknesses. I stitched the holes with stitches 2, 3 or 4 holes long depending on the degree of curvature using my usual machine embroidery thread. (I don't own a sewing machine and any attempt at using one would probably end up with a visit to Accident and Emergency.) I then accented some of the swirls with stichy gems. for the background, I got out a punch I've had for a long time - in fact, I think I used it in my first ever DT card at Crafty Cardmakers in July 2010. If you're at all interested, the post is here.

Anyway, you can see I've got stitching and gems. What about summer? Well, the summer theme is the butterflies, of course!

Apart from that, all I've added is some matting. I had intended to add some flowers, but when I saw how these elements combined, I decided to leave well alone!

I hope you can join us this fortnight.


Sunday, 11 June 2017

International Art and Soul Challenge 10

Our challenge at International Art and Soul for this fortnight is to make something for a man. It could be something for Father's Day or for some other occasion - it's up to you!

I made a card for my eldest's birthday. He's a Mathematician by background, and so I thought he'd like the effect in this card.

I fiest discovered that sort of pattern as a child - drawing lines on squared paper, and I remember how pleased I was when my dad made me a board so I could wrap thread arounds nails to get the same effect. I was very pleased when I saw there were some stacking dies from Tonic Studios that would do the same thing - both circles and squares, and I've used both varieties here to make this card.

I've completed the card with a die cut sentiment, and that's it!

I hope you can join us this time.

Labels

3d frame (1) Aall and Create (1) acetate (10) acrylic block technique (1) acrylic paint (5) alipeeps (2) animal spirit (1) apple blossom (3) aquamarkers (5) baby (1) barbara jensen (4) bbcakes (6) beading (2) beary dust (13) blackberry lane (2) blackwork (1) border punch (40) borderabilities (8) brass stencil (4) brayer (3) britania (1) Brushos (10) BSP (302) bsp spellbinders (1) C'Art US (1) candle decoration (1) card (1) card mad fairy (2) cards (1) carousel (1) CC stamping platform (1) ccm (219) ccn (1) cg (1) chalk cloud (1) chameleon pens (1) Cheery Lynn (9) ching chou kuik (1) chocolate baroque (1) christmas (2) circle cutter (3) Circle Flip Book (3) clarity (10) colour chart (13) colour map (1) coloursoft (11) coosty creations (6) coredinations (20) cosmic shimmer (1) cottage cutz (3) crafter's companion (34) crafts and me (1) crafts beautiful (1) crafty cardmakers top three (2) crafty cardmaking (1) crafty girl (2) crafty image emporium (4) crafty individuals (1) crealies dies (8) creative expressions (3) creative expressions dies (7) creative stamper (5) creative stamping magazine (5) crochet (4) cross stitch (2) cuttlebug (23) debbi moore (4) debbie moore (1) decoupage (8) delicious doodles (13) derwent coloursoft pencils (4) destinations (1) diesire (1) digi (5) digi blessings (5) digi doodle (1) digiital (2) digital (348) distress (6) distress ink (93) distress inks (4) distress oxide (21) ditital (1) docrafts (1) dovecraft (1) dover (7) dover books (1) dry embossing (43) dz doodles (1) edwardian lady (1) eileen hull (3) elizabeth craft (7) embossalicious (14) embossing (7) embossing folder (1) embossing paste (2) embroidery (1) enchanted dreams (13) entrelac (1) exploding box (2) fabric (1) face masks (1) family (1) fancy folds (1) fantasy film (1) faux bleaching (2) faux leather (1) fineliners (2) flexmarkers (8) floor polish (1) floppy latte (15) Floral Delights (1) flowers (4) foam flowers (1) form a line (1) frantic stamper (1) gel pen (1) gelli plate (21) gesso (1) gift box (1) gilding wax (5) gimp (1) gingerloft (9) glamour dust (4) glaze (3) glitter (5) glitter markers (1) glitter pens (2) glitterbabe (1) guest dt (1) hand made flowers (54) hardanger (2) hardanger embroidery (1) heartfelt creations (2) heat embossing (43) hope jacare (17) Hunkydory (1) iaas (128) ias (4) ike's art (11) imagination crafts (1) impressabilities (4) impression obsession (1) indigo blue (1) infinity card (2) ink background (3) inktense pencils (2) inky doodles (4) inkylicious (8) inkylicous (2) insetting technique (1) ivory cats (3) jewellery wire (1) jlj (2) joanna sheen (1) joanna sheen dies (4) joke de vette (2) josephine wall (2) kaleidacolor (3) kaleidoscope (1) kaleidoscope ink (1) kassal (1) kaz Kraft (3) Kelley's Kids (2) ken benner (2) kinkade (1) knitting (1) Koh-i-Noor (4) lacquer (1) lavinia (14) layering (2) lexi (2) lightweight air dry clay (1) lil diva (5) liquid pearls (3) lucido (1) luke carr (1) majestix (2) marianne (20) marianne creatables (22) mary hickmott (1) masking (5) medallion (1) media plate (2) memento (4) memory box (6) mica liquid (3) michael powell (2) milk coffee (1) modge podge (1) moonglow ink (4) my craft studio (2) My Heart Pieces (7) needle case (1) nellie snellen (4) nestibilities (76) not a card (2) origami (1) OSAAT (202) painbox poppets (1) paint pen (1) paintbox poppets (1) pamela west (4) pan pastel (8) pan pastels (46) panda bear (17) paper embroidery (23) paper flowers (1) paper piecing (1) paper pricking (7) paper weaving (1) pastels (1) peel offs (1) pencils (3) pendant die (6) perfect pearls (20) personal impressions (1) Phindy (1) photoshop elements (83) photoshope elements (1) pixie powder (4) pollycraft (1) pookie (5) pop up (1) pop up box (1) posca (5) presscut dies (2) Printable Heaven (4) pro (1) promarker water pens (1) promarkers (345) promarkers pan pastels (1) pse (56) punch (18) punched flowers (1) pyramage (1) radiant rain (3) recycle (2) reece's scrap pieces (15) reflection stamping (1) resist stamping (1) robyn's fetish (1) rotational stamps (1) sakura (40) sassy studios (1) saturated canary (1) scrappers delights (1) sentimental susan (4) sew easy (1) sew pretty (6) sewing (1) shaker card (1) sharpie (1) sheena douglass (2) shrink plastic (5) signature dies (1) silhouette (7) sizzix (74) sparkle pens (1) spectrum noir pencils (21) spellbinders (170) spellninders (1) spirelli (3) sponsor (3) spotlight (1) spray and sparkle (3) srappers' delights (2) stamperia (2) stamping (243) stamping boutique (5) stamps by chloe (1) starburst stains (3) stencil (13) stencils (11) step card (2) stitching (15) stitching cards (9) Stitchy (36) sue wilson (14) sulky (4) susan Tierney Cockburn (1) Susan's Garden (40) Susan's Garden Club (3) Susan's Garden Notes (4) sweet pea (2) sylvie (5) tags (1) tapestry stamps (6) tattered lace (6) tea bag folding (2) teresAward (1) thread art (1) tonic (21) tonic kaleidoscope (1) tonic studios (13) toucan scraps (1) tracing paper (1) travel journal (1) tri-shutter (1) trinitage (1) triple embossing (6) tutorial (1) twinkling h2os (16) umount (1) versacraft (3) Versafine (2) versafine clair (25) versamark (1) watercolour (16) watercolour markers (4) watercolour paper (1) watercolour pencils (2) waterfall card (1) web editor (1) wedding (1) wire designer (2) wizard (150) woodware (5) xcut (1)

Blog Archive

Followers