Translate

Showing posts with label inkylicious. Show all posts

Sunday, 20 November 2022

International Art and Soul Challenge 147

 The challenge for this fortnight was set by my team mate Maggie, and she wants us to post something with a Fancy Fold.

I spotted instructions for an Infinity card on Craftworld recently. I tried one of these years ago, and it was horribly difficult with having to separate out sections using a craft knife. I wasn't impressed. This version just uses four separate pieces of card, and was so much easier! You can see the instructions here.

Then, I saw somewhere, I think it was a Lavinia Facebook group, where someone had filled the various panels with different pictures and decided to try something similar. The basic card started with four pieces of card, each 8in by 4in, and the end result is 8 by 8in. This is what I came up with!


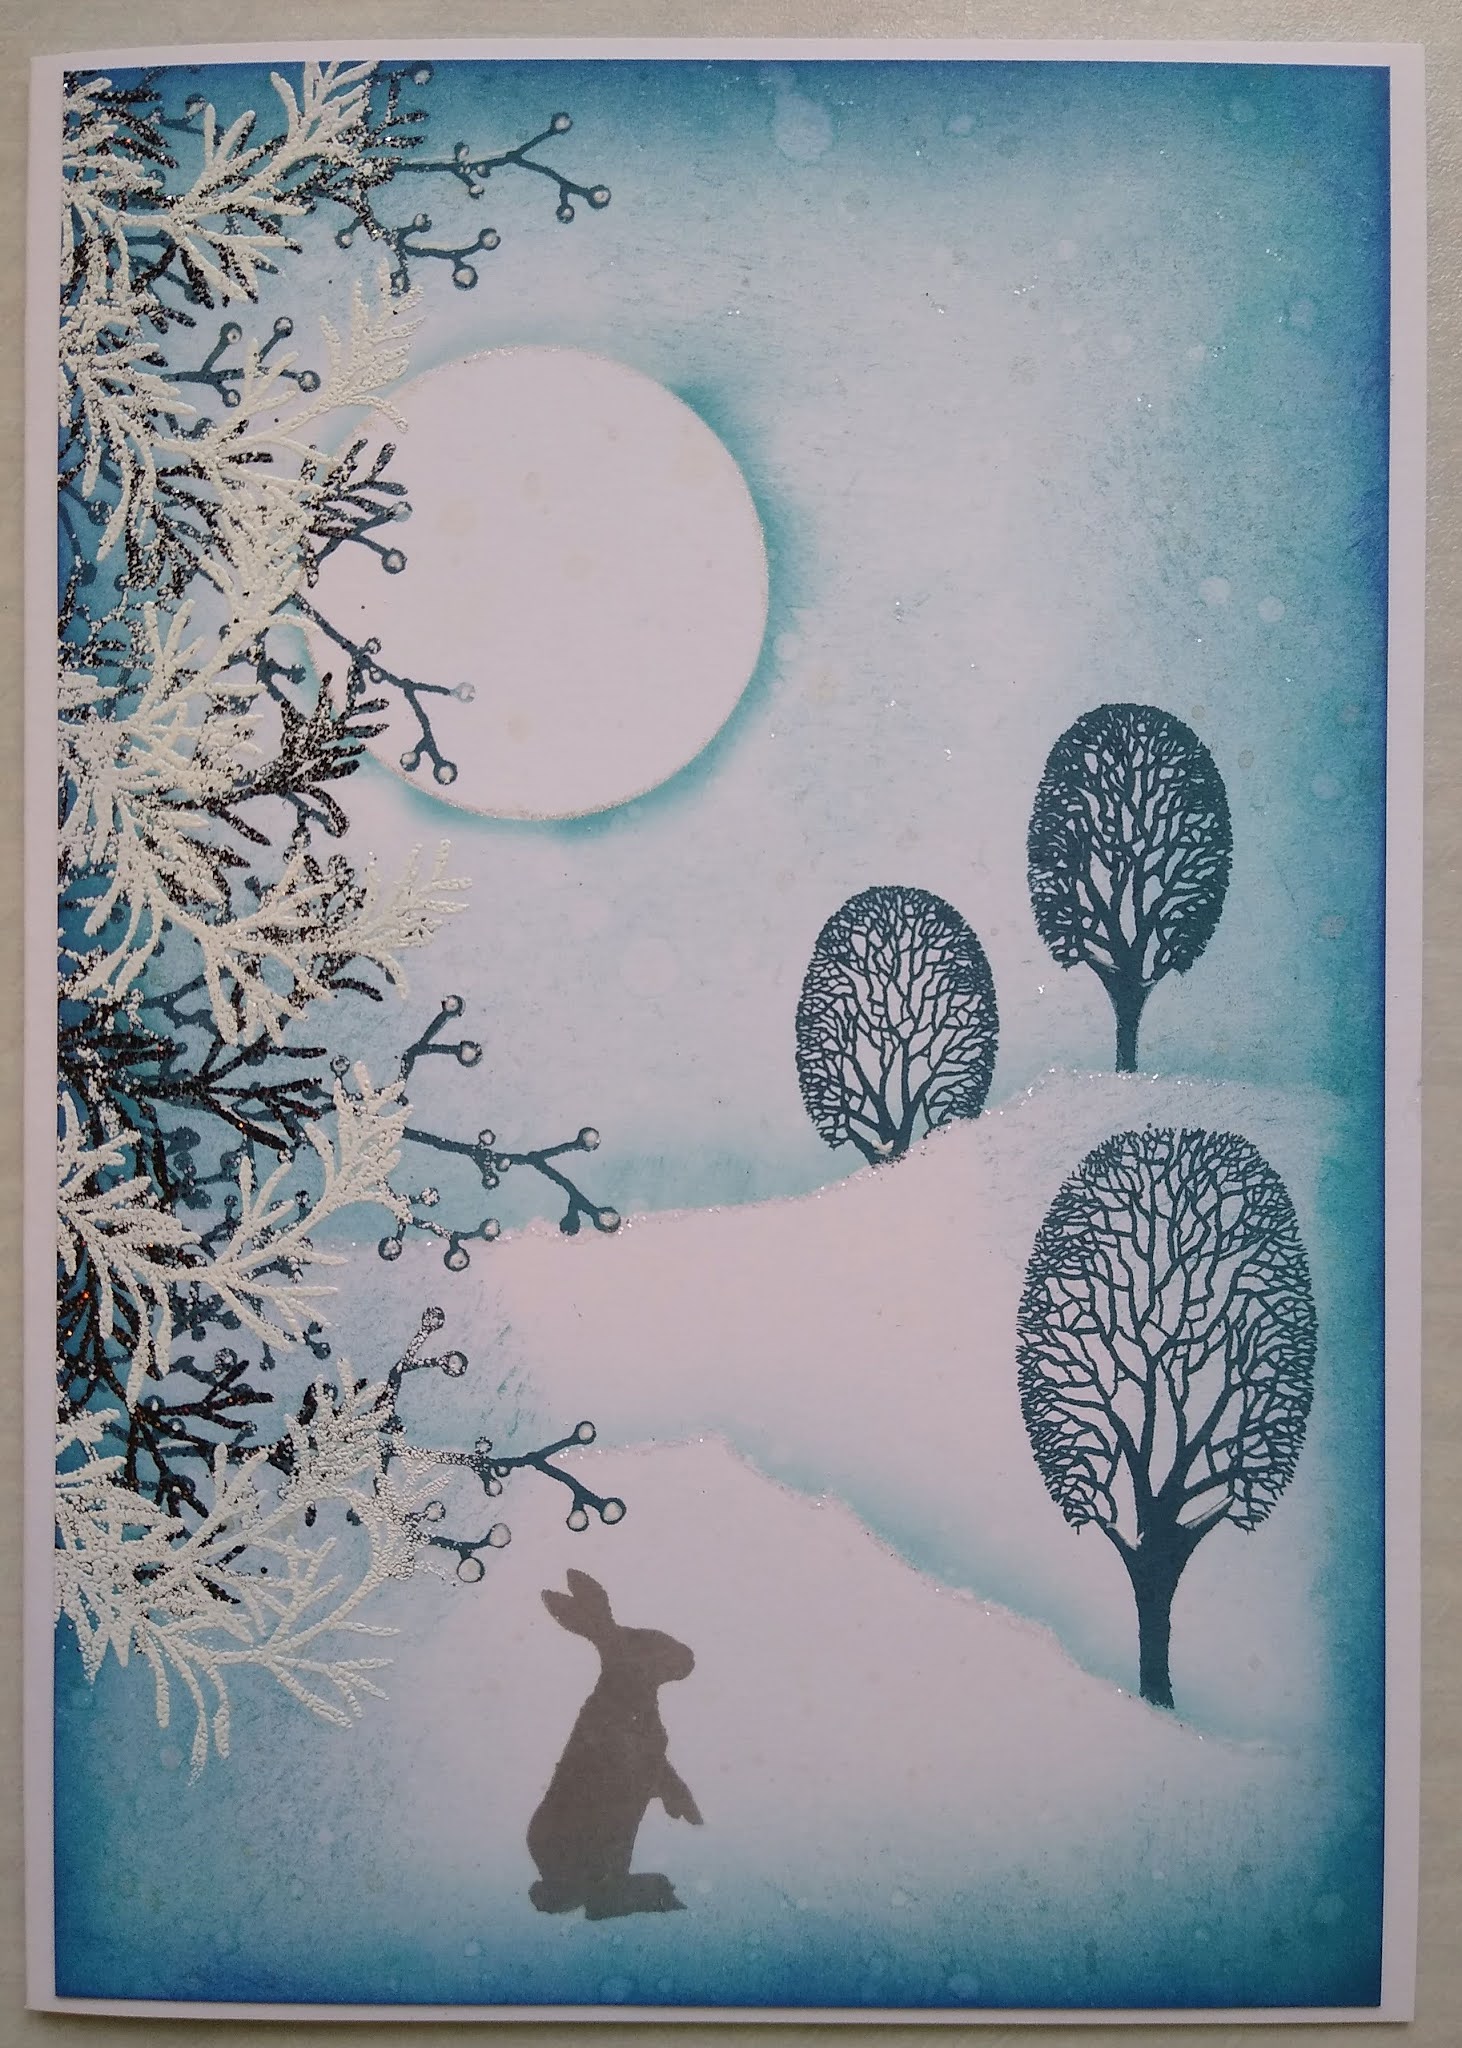
This is the front. I created the picture as a whole and then cut it to fit the panels. Anywhere there is an opening or a fold, I treated as a separate panel. The stamps here are a mix of Lavinia and Inkylicious, and the background inks are Distress while the stamping ink was Versafine Clair.

When you open as if the card is a gatefold, you get this:


Mainly Lavinia with one Inkylicious stamp as well as some Tapestry stamps in the lower, large image. When you open this along the line between the cat and the sprite, you get this:


The poppy images are the same as in the last photo - visible on two 'sides' of the card. Again Lavinia, Inkylicious and also some Clarity stamps along with stencils from a set I got at The Range. And finally, opening along the central vertical line, you get this:


Stamps this time are from Inkylicious, Artemio, Woodware, and Personal Impressions.. I left a panel without an image so I can add a message.


Throughout, I've added detail to the stamped images using Posca pens, and on this face, I added a little glitter. Opening this along the horizontal centre returns you to the front of the card.

I do hope you can join us this time.

Sunday, 23 October 2022

International Art and Soul Challenge 145

 This fortnight's theme was set by my time mate Debbie, and she wants to see Autumn-themed projects.

When tidying my craft space recently (I know, and it wasn't much tidier when I finished!) I came across a background I made some time ago and didn't use for some reason. It was perfect for this theme, so I used it as a starting point and came up with this:


I created the background using some leaf stamps, stamped in a Kaleidocolor ink pad in Autumn shades. I then coloured the leaves with Promarkers in shades close to the outlines. I then added some raindrop images using an Inkylicious stamp. I finished the background using some Distress Ink.

The sentiment was stamped using another Inkylicous stamp, using Versafine ink and copper embossing powder. Again, I added some background colour uisng Distress Ink, and layered both the background and sentiment with brown card and attached everything to a gold-coloured blank card from Tattered Lace. And that's it.

I do hope you can join us this time.


Sunday, 9 October 2022

International Art and Soul Challenge 144

 This challenge was set by my team mate Chriss, and she would like to see projects in orange and black. 

My first thought on seeing that colour combination is that I don't like orange, and then a moment later, that I do like peach, coral, and all sorts of oranges that are not the shade I immediately think of as 'orange'. Funny how my brain works!

So, armed with a couple of Lavinia stamps, a couple of Lavinia stencils, an Inkylicious mask, a rubber stamp of unknown origin, some Distress Ink, a black fineliner and a little paint pen, I came up with this.


It's a simple card, and I had to force myself to leave it overnight to stop me adding more decoration. I did, in fact, add a few small stamped images (the rings) the next day, but stopped there. The Lavinia stencils are fairly obvious, I think, but the Inkylicious mask is one of their sun/moon circles, and I used it in pale areas to give some overlapping discs shapes, the most obvious of which is towards the bottom left corner. I just wanted to tone down some fairly white areas with ink that was already on my brush. I used mainly Spiced Marmalade, but added a little Crackling campfire on the background.

The Lilium flowers (the group and one of the individual stamps) were stamped in Versafine Clair ink, and the outlines of the flowers accentuated with a paint pen. I then used Distress Ink in Crackling Campfire as a watercolour for the rest of the flowers.

A very fine black mat, and that's it. I haven't added a sentiment, might might well do that when I know where the card is going.

I do hope you can join us this time.

Sunday, 25 September 2022

International Art and Soul Challenge 143

 The challenge for this fortnight was set by my team mate Jane who wants projects on the theme of Trees/Wood.


The focal image is stamped using stamps from Lavinia (tree trunks), Inkylicious (branches and ferns) and Clarity (leaves). I used an Inkylicious mask for the distant hills, and some die cut paper tomask the sun. The background was inked using Distress Ink. Most stamping was done in Versafine Clair, although the leaves are also stamped in Distress Ink. I coloured any clear parts of the trunks or leaves with coloured pencil.

The background was embossed with a Crafter's Companion folder, and I added some Versafine Clair ink to the raised areas with a brayer. I used an orange base card (from Tattered Lace) some card for matting, and some ribbon from my stash to complete the card.

Sunday, 19 June 2022

International Art and Soul Challenge 136

 The challenge for this fortnight was chosen by my team mate Jane, and she wants to see projects featuring 4 Legged Friends

I've spent some time this year (and last year) trying to get better at creating landscapes, and while I've managed to get a bit better, I still don't feel 'I've arrived'! But, that doesn't mean I don't enjoy trying.


For this card, I wanted a kind of fantasy landscape. I started with a piece of card for a DL card, and roughly designated 'sky' and 'ground' using Distress Ink in Peeled Paint and Broken China. Then, I added some detail to the ground using paper masks and more Distress Ink. That done, I added a bit of unrealism with a stencil of differently-sized spots and more Distress Ink - this time in Mustard Seed. I added some vegetation to the sky area using a Crafter's Companion leafy stencil.

The next step was to add some stamping, so I started with the cat, and continued with the bluebells and text - all from Lavinia. Then I added some cow parsley and the butterfly, both from Inkylicious.

At this stage, I deepened the colour of the edges using more Distress Ink in Stormy Sky and Forest Moss, and completed the picture with some Posca pens to accentuate the bluebells and cow parsley, and finally to add detail to the butterfly and to the background.

Stamping mainly used Versafine Clair, although some of the Cow Parsley used more Distress Ink to create a subtler effect.

I completed the card with a little gold metallic shading around the edges, but that's so subtle it's not at all visible in the photo!

I wanted a magical corner in spring with the sunlight reflecting off pollen and dust and the cat studying her surroundings from a secluded spot. 

I do hope you can join us this time.

Monday, 11 April 2022

International Art and Soul Challenge 131

 The theme for this fortnight's challenge is Landscapes, and it was set by my team mate, Craftygirl.

I love the gorgeous landscapes I see online - those created by users of Lavinia, Inkylicious and Card-io stamps, for example. I'm not remotely artistic, and my attempts always seem lacking to me. I do use them occasionally, and definitely find the wintery ones easier - partly because they need a lot less ink!

Quite a few years ago, I bought the Lavinia stamp Fairy Bridge at Alexandra Palace. I've stamped it several times, but never used in a finished project, as far as I can remember. But, I decided to give it another outing and this is what I came up with.


My normal problem with this stamp is giving it context. This time, after stamping, I extended the rocky area using ink and paper for masking, adding some shading using some Pan Pastel. I used more ink, pastel, and a mask to shade the sun, sky and the water, and framed the image with some grass using a stamp from Inkylicious. I completed the image with another Inkylicious stamp (the bird), some more ink around the edges, and finally some glitter on the water.

I know it's not up to the standard of the ones I see elsewhere, but I'm not unhappy overall. It has definitely helped to continue the rocky foreground.

So, let us see your landscapes - however you create them.

Sunday, 3 January 2021

International Art and Soul Challenge 99

 The theme for the first fortnight of the year is Landscapes. I'm hosting the challenge, and I'd love to see a landscape for any season. With that in mind, I made some Christmas cards using a range of stamps and stencils from Inkylicious, Creative Stamping Magazine and John Next Door. The background shading was done in Distress Ink, while the darker parts use Versafine Clair.


I did several of this style for last Christmas, and I do like the results, although I have to say I have a significant failure rate with several attempts going into the bin!


The trees here use stamps from Circa Design that I've had for many years.


And finally, for this one I added some heat embossed foliage.

I'm looking forward to seeing your landscapes, so please join us!

Monday, 11 March 2019

Crafty Cardmakers Challenge 229

The challenge for this fortnight is Make it Green.

I decided to have a go at various techniques which are new to me, and while I'm happy with the result, there are things I'll do differently next time.

I started with a die from Eileen Hull/Sixxix: the Travel Journal. Now, this die does give a very tall, narrow journal in its original form, so I followed a tutorial from Eileen on how to make it a bit wider. For me, it's still rather narrow, but it's definitely an improvement on the original. I think the reason for the odd shape is that Eileen always restricts herself to designing for small die cutters, so this die will go through a basic Big Shot. I do wish she's design for bigger machines and give us something that takes standard size paper: A4 or A5. But still. Her suggestion is to cut a back and front as usual, but instead of using the scored edges to form a spine, you cut an extra bit and put the spine scores and holes at both edges, which is what I did here.

Before cutting, I covered some grey board with Kraftex on one side only. Then, I coated the Kraftex and back sides with gesso. This is definitely something I'd do differently. The Kraftex probably doesn't need the gesso, and the grey board absorbed quite a lot so the pieces had a distinct curve which, while not a visual issue (to me) meant that attaching the three pieces was problematic. But, I'm getting ahead of myself.

After the gesso, I used a gelli plate to apply distress oxide inks to give an overall greenish shade. (I only have a few of these inks, and none of them is green!) Then, I used stamps and inks (mainly Memento) on the front and back inside and out.


I was playing, so I've used a range of stamps and stamping techniques. The inside uses repeating background stamps from Inkylicious. The front uses a lace rubber stamp for which I have no record of the manufacturer, and the back, stamps from Printable Heaven, I think.

Although its not obvious, I added a piece of lace to the centre of the front. I used Modge Podge for this, and because the inks I used were water based, there was some transfer, so the lace definitely matches the rest!  To finish the front, I added some lacy flowers cut using Tattered Lace dies. I used Coredinations card and gently sanded the pieces before sticking them, again with Modge Podge. I used Modge Podge over everything as a sealer before assembling the pieces.

Here, I found that glue wasn't going to work, at least, not on its own. So, I used the otherwise unused punched holes in the front and back covers and spine to reinforce the structure with thread.


You can just see the thread in this photo.

Because I'm using the die cuts in a way that was not intended, I had to manually punch holes in the spine for attaching pages inside and a further one so I can add an elastic closure when that becomes necessary.
And to give an idea of the inside, I've put a single double-sheet in each of the four elastic holders.

Next time, I'll probably revert to covering the inside of the cover with paper rather than using gesso. That should make it easier to assemble the journal, but I might still use the reinforcement technique!

I hope you can join us this time.

Labels

3d frame (1) Aall and Create (1) acetate (10) acrylic block technique (1) acrylic paint (5) alipeeps (2) animal spirit (1) apple blossom (3) aquamarkers (5) baby (1) barbara jensen (4) bbcakes (6) beading (2) beary dust (13) blackberry lane (2) blackwork (1) border punch (40) borderabilities (8) brass stencil (4) brayer (3) britania (1) Brushos (10) BSP (302) bsp spellbinders (1) C'Art US (1) candle decoration (1) card (1) card mad fairy (2) cards (1) carousel (1) CC stamping platform (1) ccm (219) ccn (1) cg (1) chalk cloud (1) chameleon pens (1) Cheery Lynn (9) ching chou kuik (1) chocolate baroque (1) christmas (2) circle cutter (3) Circle Flip Book (3) clarity (10) colour chart (13) colour map (1) coloursoft (11) coosty creations (6) coredinations (20) cosmic shimmer (1) cottage cutz (3) crafter's companion (34) crafts and me (1) crafts beautiful (1) crafty cardmakers top three (2) crafty cardmaking (1) crafty girl (2) crafty image emporium (4) crafty individuals (1) crealies dies (8) creative expressions (3) creative expressions dies (7) creative stamper (5) creative stamping magazine (5) crochet (4) cross stitch (2) cuttlebug (23) debbi moore (4) debbie moore (1) decoupage (8) delicious doodles (13) derwent coloursoft pencils (4) destinations (1) diesire (1) digi (5) digi blessings (5) digi doodle (1) digiital (2) digital (348) distress (6) distress ink (93) distress inks (4) distress oxide (21) ditital (1) docrafts (1) dovecraft (1) dover (7) dover books (1) dry embossing (43) dz doodles (1) edwardian lady (1) eileen hull (3) elizabeth craft (7) embossalicious (14) embossing (7) embossing folder (1) embossing paste (2) embroidery (1) enchanted dreams (13) entrelac (1) exploding box (2) fabric (1) face masks (1) family (1) fancy folds (1) fantasy film (1) faux bleaching (2) faux leather (1) fineliners (2) flexmarkers (8) floor polish (1) floppy latte (15) Floral Delights (1) flowers (4) foam flowers (1) form a line (1) frantic stamper (1) gel pen (1) gelli plate (21) gesso (1) gift box (1) gilding wax (5) gimp (1) gingerloft (9) glamour dust (4) glaze (3) glitter (5) glitter markers (1) glitter pens (2) glitterbabe (1) guest dt (1) hand made flowers (54) hardanger (2) hardanger embroidery (1) heartfelt creations (2) heat embossing (43) hope jacare (17) Hunkydory (1) iaas (128) ias (4) ike's art (11) imagination crafts (1) impressabilities (4) impression obsession (1) indigo blue (1) infinity card (2) ink background (3) inktense pencils (2) inky doodles (4) inkylicious (8) inkylicous (2) insetting technique (1) ivory cats (3) jewellery wire (1) jlj (2) joanna sheen (1) joanna sheen dies (4) joke de vette (2) josephine wall (2) kaleidacolor (3) kaleidoscope (1) kaleidoscope ink (1) kassal (1) kaz Kraft (3) Kelley's Kids (2) ken benner (2) kinkade (1) knitting (1) Koh-i-Noor (4) lacquer (1) lavinia (14) layering (2) lexi (2) lightweight air dry clay (1) lil diva (5) liquid pearls (3) lucido (1) luke carr (1) majestix (2) marianne (20) marianne creatables (22) mary hickmott (1) masking (5) medallion (1) media plate (2) memento (4) memory box (6) mica liquid (3) michael powell (2) milk coffee (1) modge podge (1) moonglow ink (4) my craft studio (2) My Heart Pieces (7) needle case (1) nellie snellen (4) nestibilities (76) not a card (2) origami (1) OSAAT (202) painbox poppets (1) paint pen (1) paintbox poppets (1) pamela west (4) pan pastel (8) pan pastels (46) panda bear (17) paper embroidery (23) paper flowers (1) paper piecing (1) paper pricking (7) paper weaving (1) pastels (1) peel offs (1) pencils (3) pendant die (6) perfect pearls (20) personal impressions (1) Phindy (1) photoshop elements (83) photoshope elements (1) pixie powder (4) pollycraft (1) pookie (5) pop up (1) pop up box (1) posca (5) presscut dies (2) Printable Heaven (4) pro (1) promarker water pens (1) promarkers (345) promarkers pan pastels (1) pse (56) punch (18) punched flowers (1) pyramage (1) radiant rain (3) recycle (2) reece's scrap pieces (15) reflection stamping (1) resist stamping (1) robyn's fetish (1) rotational stamps (1) sakura (40) sassy studios (1) saturated canary (1) scrappers delights (1) sentimental susan (4) sew easy (1) sew pretty (6) sewing (1) shaker card (1) sharpie (1) sheena douglass (2) shrink plastic (5) signature dies (1) silhouette (7) sizzix (74) sparkle pens (1) spectrum noir pencils (21) spellbinders (170) spellninders (1) spirelli (3) sponsor (3) spotlight (1) spray and sparkle (3) srappers' delights (2) stamperia (2) stamping (243) stamping boutique (5) stamps by chloe (1) starburst stains (3) stencil (13) stencils (11) step card (2) stitching (15) stitching cards (9) Stitchy (36) sue wilson (14) sulky (4) susan Tierney Cockburn (1) Susan's Garden (40) Susan's Garden Club (3) Susan's Garden Notes (4) sweet pea (2) sylvie (5) tags (1) tapestry stamps (6) tattered lace (6) tea bag folding (2) teresAward (1) thread art (1) tonic (21) tonic kaleidoscope (1) tonic studios (13) toucan scraps (1) tracing paper (1) travel journal (1) tri-shutter (1) trinitage (1) triple embossing (6) tutorial (1) twinkling h2os (16) umount (1) versacraft (3) Versafine (2) versafine clair (25) versamark (1) watercolour (16) watercolour markers (4) watercolour paper (1) watercolour pencils (2) waterfall card (1) web editor (1) wedding (1) wire designer (2) wizard (150) woodware (5) xcut (1)

Blog Archive

Followers